
| - Thay đổi vật liệu cho vật thể bằng GUI - |
Tùy biến ảnh giao đại diện thường dùng một hoặc nhiều ảnh/vật liệu mẫu đã có và gắn nó vào ảnh đại diện. Bài viết này, sẽ sử dụng GUI để kết hợp 2 vật liệu (texture) để tạo nên ảnh đại diện do người dùng lựa chọn.
Chuẩn bị
SelectTexture.unitypackage
Cách để làm
B1. Nhấp phải vào thẻ Project và chọn Import Package | Custom Package và mở file SelectTexture vừa tải ở trên.

B2. Tại thẻ Project, double click vào selTexScene.

B3. Vẫn tại thẻ Project, nhấp nút Create | Material và đặt tên là selectableMaterial. Ở thẻ Inspector, đổi Shader thành Decal.

B4. Kéo thả material vừa tạo ở thẻ Project vào Avatar ở thẻ Hierarchy.

B5. Tại thẻ Project, nhấp chọn nút Create | C# Script và đặt tên là SelectTexture. Chèn đoạn code sau vào:
using UnityEngine;
using System.Collections;
public class SelectTexture : MonoBehaviour
{
public Texture2D[] faces;
public Texture2D[] props;
void OnGUI() {
for (int i = 0; i < faces.Length; i++)
if (GUI.Button(new Rect(0, i * 64, 128, 64), faces[i])) ChangeMaterial("faces", i);
for (int j = 0; j < props.Length; j++)
if (GUI.Button(new Rect(128, j * 64, 128, 64), props[j])) ChangeMaterial("props", j);
}
void ChangeMaterial(string category, int index)
{
if (category == "faces")
renderer.material.mainTexture = faces[index];
if (category == "props")
renderer.material.SetTexture("_DecalTex", props[index]);
}
}
B6. Lưu đoạn code lại và kéo thả vào Avatar ở thẻ Hierarchy.
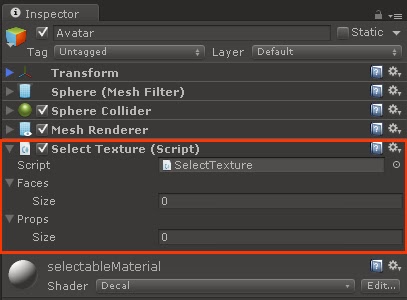
B7. Nhấp chọn Avatar, qua thẻ Inspector, đổi giá trị Size của Faces và Props thành 2 và kéo thả các file ảnh face1, face2, prop1, prop2 ở thẻ Project vào thẻ Inspetor ở các vị trí như sau:

B8. Ấn nút Play để kiểm tra thành quả.


No comments:
Post a Comment